
Connecting Rpi through VNC Server automatically notes:
There are many options to connect to the RPi (raspberry pi) remotely documented extensively in the internet. The method that is simple and powerful is through a VNC (Virtual Network Computing) server. It’s not a smooth process to make it work but once is up and running is worth the effort. I would like to share my notes on the subject and full credit to the tutorials I refer to as they were my guides in this journey. If you use these notes for yourself, please read the assumptions section carefully as the devil is in the detail and it will give you hints if you are looking to do more fancy stuff.
Assumptions:
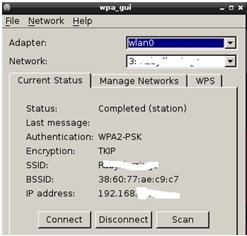
1. The Rpi is connected to the internet trough Wi-Fi not a landline. Even though it might be the obvious step in order to ensure proper connection it is always the first place to check. In the Raspbian Wheezy operating system. Important information from WPA-GUI program is the name of the Network you are connected with your respective IP address. Refer to the picture below:
There are many options to connect to the RPi (raspberry pi) remotely documented extensively in the internet. The method that is simple and powerful is through a VNC (Virtual Network Computing) server. It’s not a smooth process to make it work but once is up and running is worth the effort. I would like to share my notes on the subject and full credit to the tutorials I refer to as they were my guides in this journey. If you use these notes for yourself, please read the assumptions section carefully as the devil is in the detail and it will give you hints if you are looking to do more fancy stuff.
Assumptions:
1. The Rpi is connected to the internet trough Wi-Fi not a landline. Even though it might be the obvious step in order to ensure proper connection it is always the first place to check. In the Raspbian Wheezy operating system. Important information from WPA-GUI program is the name of the Network you are connected with your respective IP address. Refer to the picture below:
If you don’t see an IP address or if it is turning on and off, I suggest you reboot the RPI, especially if you are switching networks or it is the first time you are setting up the internet connection.
2. VNC client used is RealVNC for Windows. Please refer to use with other operating systems. In addition the RealVNC viewer is also available as an app for Android and Apple devices. Refer to http://www.realvnc.com/download/viewer/
3. Another basic assumption is that you are familiar using raspi-config to change settings in your Rpi and that you are familiar with nano editor. It’s straight forward but it’s necessary to follow the suggested tutorials.
4. Last but not least both the client and the server are connected in the same Network. This can be tricky to troubleshoot and once the Rpi is on the field you need to think that it is not such an obvious assumption and it will be critical once you setup the Rpi to connect the VNC server automatically. Imagine if you develop a web-server that needs to be accessed remotely from your office, home or any place you happen to be. Technically it should not make a difference once you know your IP address, however it does require some tweaking to make it work. If you need to do this, I suggest investigating how to allow VNC communication by changing firewall and router settings.
Making it work:
1. Installation of VNC server in Rpi is the first step in the process. An excellent tutorial can be found at: http://www.neil-black.co.uk/raspberry-pi-beginners-guide#.VHoDfjHF8ls. It’s one of the best written tutorials I found in the subject; however my personal experience it is not plug and play tutorial. Once I completed all the steps, I was able to communicate through VNC server and learn a few things in the process. Below the section that I struggle the most:
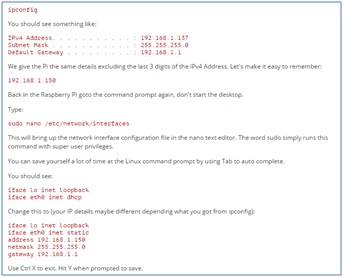
Making static IP address to work was very time consuming. I suggest you read the following tutorial for this section if you struggle as well: https://www.modmypi.com/blog/tutorial-how-to-give-your-raspberry-pi-a-static-ip-address. Also consider that is not necessary to have the static IP to work either. I was able to bypass this section all together the second time I tried it again.
2. Once the VNC server is installed, you have been successful to connect through RealVNC viewer in one of your devices. The next step is to make the Rpi to connect VNC server automatically after booting. By doing this you no longer need a keyboard, mouse or monitor to access your Rpi which is extremely useful for robotic applications or if you simply feel more comfortable to use your laptop to make modifications as you can access your windows applications at the same time. In order to accomplish automatic booting refer to the following tutorial Step 4: http://www.instructables.com/id/Setting-up-a-VNC-Server-on-your-Raspberry-Pi/step4/Setting-up-the-Pi-to-Automatically-Start-a-VNC-Ser/
3. In my humble opinion, this is the missing piece in the Neil Black tutorial. Once you finish the steps of this tutorial, you should test it first with monitor, keyboard and mouse. Use the ping command in Windows to test the communication is open first. Then check that VNC server has connected automatically by connecting through RealVNC. If you have a successful test, then proceed to remove your peripheral devices, and do your final test by following the same steps (Ping & Connect to VNC). Congratulations!
Hope my notes help you in your journey, if you have any comments or additional tips please feel free to share.

 RSS Feed
